
Changing a smart thermostat can seem daunting, but with the right tools and instructions, it’s a manageable DIY project. Whether you’re upgrading to a programmable or smart thermostat, this step-by-step guide will help you through the process, ensuring your home’s heating and cooling system runs efficiently.
Tools and Materials Needed:
- New thermostat
- Screwdrivers (Phillips and flathead)
- Drill (if needed)
- Masking tape or labels
- Pencil or marker
- Level
- Voltage tester (optional)
- Wire stripper/cutter (optional)
General Steps on how to change a thermostat:

Image : How to change a Thermostat
Step 1: Turn Off the Power
Safety first! Locate your circuit breaker panel and turn off the power to your HVAC system. This will prevent any risk of electrical shock while you work.
Step 2: Remove the Old Thermostat
- Remove the Faceplate: Gently pull or unscrew the faceplate of your old thermostat to expose the wiring and mounting screws.
- Label the Wires: Before disconnecting any wires, use masking tape or labels to mark each wire according to its terminal (e.g., R, W, Y, G, C). Take a photo for reference if needed.
- Disconnect the Wires: Use a screwdriver to loosen the terminal screws and carefully disconnect the wires. Ensure the wires do not fall back into the wall.
- Remove the Base Plate: Unscrew the base plate from the wall and set it aside.
Step 3: Prepare the Wall for the New Thermostat
- Check the Existing Holes: Ensure the new thermostat’s base plate aligns with the existing holes. If not, you may need to drill new ones.
- Use a Level: Place the new thermostat’s base plate on the wall and use a level to ensure it’s straight. Mark the positions of the new holes if needed.
- Install Anchors: If the new holes do not align with studs, use wall anchors to ensure the base plate is securely attached.
Step 4: Install the New Thermostat
- Mount the Base Plate: Secure the new thermostat’s base plate to the wall using the provided screws. Ensure it’s level before fully tightening the screws.
- Connect the Wires: Refer to the labels you placed on the wires earlier and connect them to the corresponding terminals on the new thermostat. Tighten the terminal screws to secure the wires.
- Attach the Faceplate: Once the wiring is complete, attach the faceplate of the new thermostat according to the manufacturer’s instructions.
Step 5: Power Up and Configure the Thermostat
- Restore Power: Go back to the circuit breaker and turn the power back on to your HVAC system.
- Set Up the Thermostat: Follow the manufacturer’s setup instructions to configure your new thermostat. This may include setting the date and time, programming your preferred temperature schedule, or connecting to Wi-Fi for smart thermostats.
Step 6: Test the Thermostat
- Turn on the HVAC System: Use the new thermostat to turn on your heating or cooling system. Ensure that the system responds correctly to the thermostat’s commands.
- Check All Modes: Test both the heating and cooling modes to make sure the thermostat is working properly in all settings.
Steps to replace thermostat- Based on Number of Wires:
Changing a thermostat can enhance your home’s energy efficiency and comfort. Whether you have a basic 2-wire system or a more complex 8-wire setup, this step-by-step guide will help on how to change a thermostat
How to change a thermostat – 2 Wire (Heating Only)
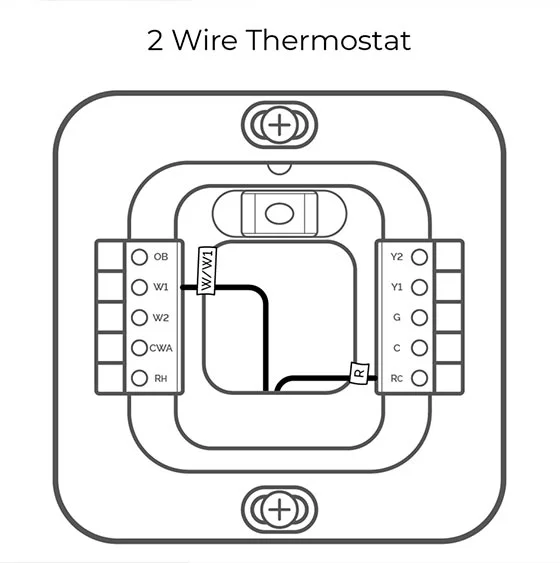
- Label and Disconnect Wires: Typically, you will have one red (R) and one white (W) wire.
- Connect Wires to New Thermostat: Connect R to the R terminal and W to the W terminal on the new thermostat.
- Mount and Test: Attach the base plate, mount the thermostat, restore power, and test the heating.
How to change a thermostat – 3 Wire (Heating with Fan Control)
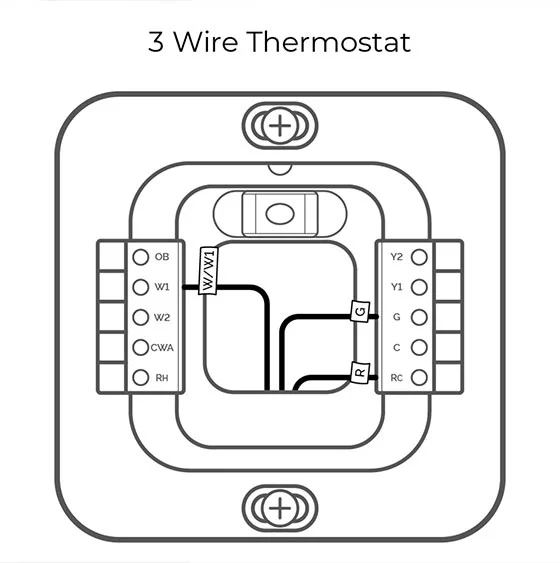
- Label and Disconnect Wires: You will typically have red (R), white (W), and green (G) wires.
- Connect Wires to New Thermostat: Connect R to R, W to W, and G to G terminals.
- Mount and Test: Attach the base plate, mount the thermostat, restore power, and test the heating and fan control.
How to change a thermostat – 4 Wire (Heating and Cooling)
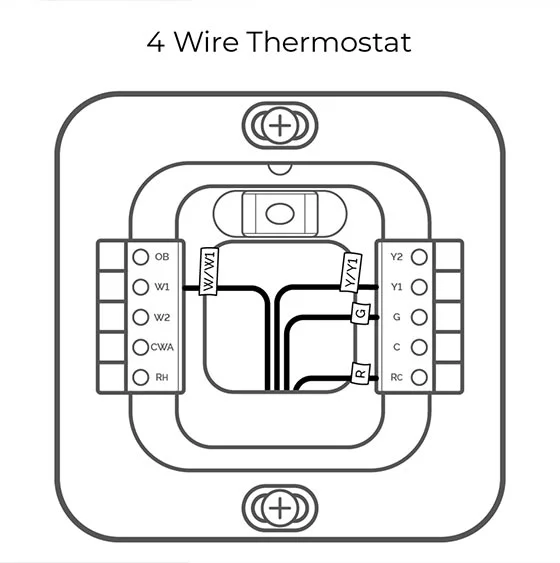
- Label and Disconnect Wires: Typically, you will have red (R), white (W), yellow (Y), and green (G) wires.
- Connect Wires to New Thermostat: Connect R to R, W to W, Y to Y, and G to G terminals.
- Mount and Test: Attach the base plate, mount the thermostat, restore power, and test heating and cooling.
How to change a thermostat – 5 Wire (Heating, Cooling, and Common Wire)
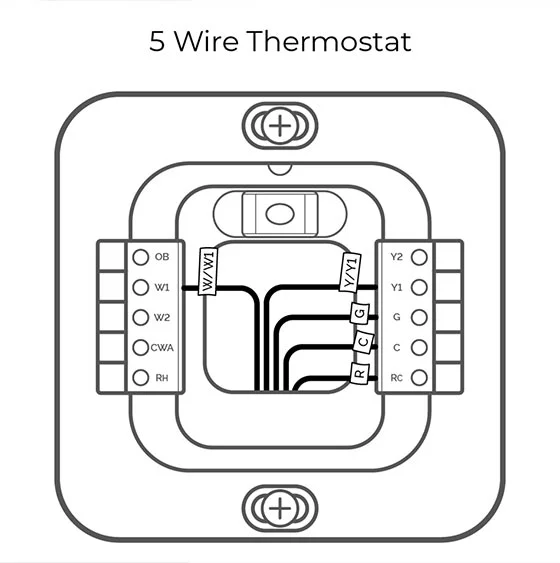
- Label and Disconnect Wires: Typically, you will have red (R), white (W), yellow (Y), green (G), and common (C) wires.
- Connect Wires to New Thermostat: Connect R to R, W to W, Y to Y, G to G, and C to C terminals.
- Mount and Test: Attach the base plate, mount the thermostat, restore power, and test all functions.
How to change a thermostat – 6 Wire (Two-Stage Heating and Cooling)
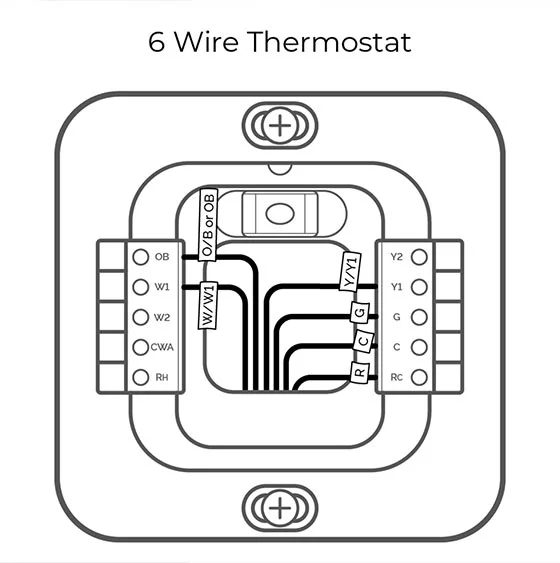
- Label and Disconnect Wires: You will typically have red (R), white (W1 and W2), yellow (Y), green (G), and common (C) wires.
- Connect Wires to New Thermostat: Connect R to R, W1 to W1, W2 to W2, Y to Y, G to G, and C to C terminals.
- Mount and Test: Attach the base plate, mount the thermostat, restore power, and test all functions.
How to change a thermostat – 7 Wire (Two-Stage Heating, Cooling, and Auxiliary Heat)
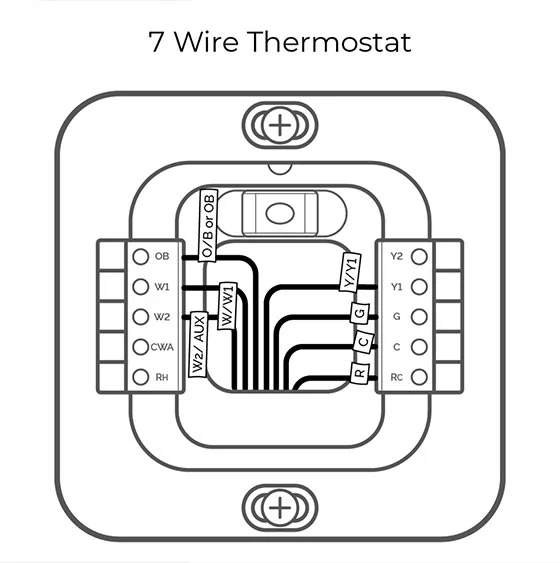
- Label and Disconnect Wires: You will have red (R), white (W1 and W2), yellow (Y), green (G), common (C), and additional auxiliary heat wire (AUX).
- Connect Wires to New Thermostat: Connect R to R, W1 to W1, W2 to W2, Y to Y, G to G, C to C, and AUX to AUX terminals.
- Mount and Test: Attach the base plate, mount the thermostat, restore power, and test all functions.
How to change a thermostat – 8 Wire (Advanced Systems with Heat Pump)
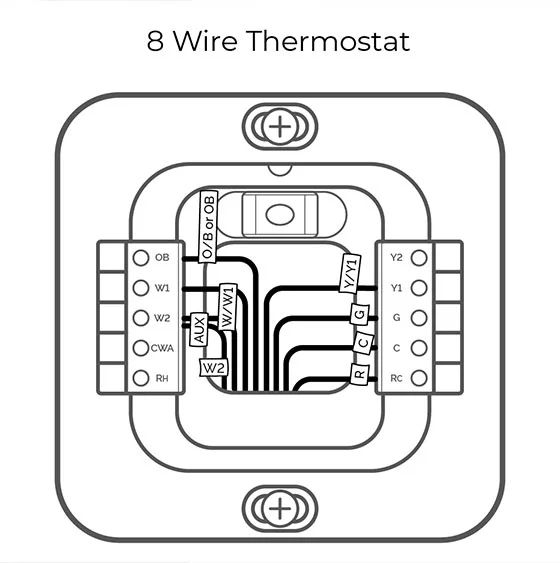
- Label and Disconnect Wires: You will have red (R), white (W), yellow (Y), green (G), common (C), and wires for heat pump (O/B) and additional stages or accessories.
- Connect Wires to New Thermostat: Connect R to R, W to W, Y to Y, G to G, C to C, and O/B to O/B terminals, plus any additional wires according to the manual.
- Mount and Test: Attach the base plate, mount the thermostat, restore power, and test all functions.
[azp_custom_product id=”10″]
Explanation on how to change a thermostat wire terminal
Understanding on how to change a thermostat wire terminals is crucial for proper installation and operation. Here is a detailed explanation of the common wire terminals you might encounter (R, W, Y, G, C):
1. R (Red Wire):
- Function: Power
- Details: The R terminal provides the power from the transformer to the thermostat. There are typically two types of R terminals: Rc (for cooling) and Rh (for heating). In some systems, you might see only one R terminal, in which case it’s often jumpered to both Rc and Rh.
2. W (White Wire):
- Function: Heating
- Details: The W terminal connects to the heating system. When the thermostat calls for heat, it sends a signal through the W wire to turn on the heating system. In systems with multiple stages of heating, you may see additional W terminals, such as W1 and W2.
3. Y (Yellow Wire):
- Function: Cooling
- Details: The Y terminal connects to the air conditioning compressor. When the thermostat calls for cooling, it sends a signal through the Y wire to activate the cooling system. Like heating, systems with multiple stages of cooling may have additional Y terminals, such as Y1 and Y2.
4. G (Green Wire):
- Function: Fan
- Details: The G terminal controls the fan relay. When the thermostat calls for the fan to turn on (for heating, cooling, or just circulating air), it sends a signal through the G wire to the fan relay.
5. C (Blue or Black Wire):
- Function: Common
- Details: The C terminal, also known as the common wire, provides a continuous flow of 24V power to the thermostat. This is essential for powering the thermostat itself, especially for smart thermostats that require a constant power source for their displays and Wi-Fi capabilities.
How to Change a Thermostat on Additional Terminals (Less Common):
- O/B (Orange or Blue Wire): Used for heat pump systems to switch between heating and cooling modes. The O wire controls the reversing valve in cooling mode, and the B wire controls it in heating mode.
- E (Emergency Heat): Used in heat pump systems to activate the emergency heating.
- AUX (Auxiliary Heat): Used in heat pump systems for the auxiliary heat source.
- L: Used for system monitor or diagnostic lights.
- S1 and S2: Sometimes used for external sensors or additional control features.
Conclusion
How to change a thermostat, regardless of the number of wires, is a straightforward DIY project that can lead to improved energy efficiency and comfort in your home. By following these steps and ensuring you correctly connect each wire to its corresponding terminal, you can successfully replace your old thermostat with a new one. Always prioritize safety by turning off the power before starting any electrical work and consult on how to change a thermostat from manual for specific wiring instructions. Enjoy the benefits of your upgraded thermostat and the enhanced control it provides over your home’s climate.